Build Your Skills
Learn music theory Train your ears Track your tempoRead Now


Get the Newsletter
Categories
- | BeatMirror (11)
- | HearEQ (11)
- | Waay (23)
- | WaayFinder (1)
- Audio (16)
- For musicians (34)
- Guitar (2)
- Music theory (15)
- News (44)
- Startup stories (2)
- Tutorial (4)
Keep in Touch
About Ten Kettles
We love music, we love learning, and we love building brand new things. We are Ten Kettles.
Read more >-
April 7, 2015
Highs and Lows: an Audio Primer (Part 1)
The goal of this article is to get you, the reader, comfortable with the idea of audio frequency. If you want to know what all the “lows” and “highs” stuff is about—and how you can use it—this is for you. I’m talking about being able to say “Hey, the vocals on that track are sounding pretty nasal, let’s cut some mids.” This’ll be knowledge you can use.
The background
Let’s start with the basics. Take a listen to this train. It’s one of Ontario’s big green and white trains going by in the distance. The train itself sounds pretty rumbly, and in audio-speak, you could say it’s got a lot of “lows” or a big “low-end.” Below is what it looks like as a picture:
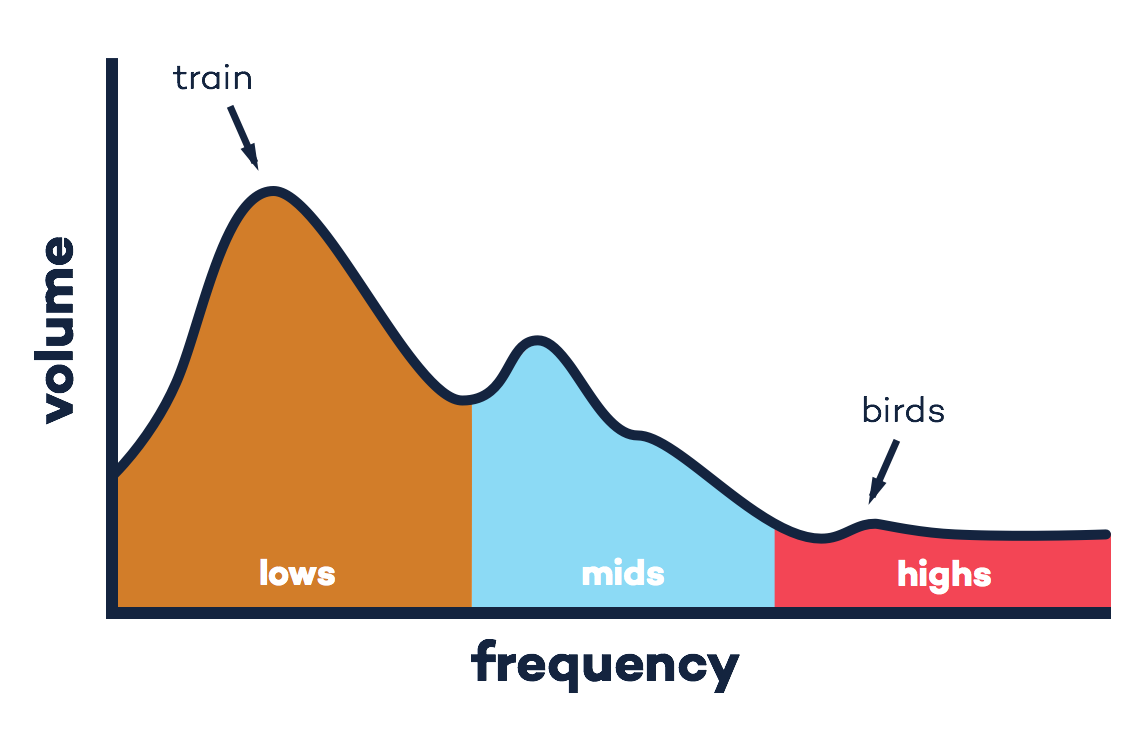
That term, “lows,” means low frequencies. Every sound is made of up low frequencies (like you heard from that train), high frequencies (like a squeaky door), and everything in between. Pick up a bass guitar, you’ll get lots of lows; start hitting keys on the high-end of your piano, you’ll get some highs.
Here’s another sample. It’s me strumming a guitar. This one’s not as obvious—you can’t really say it’s particularly heavy on the lows or highs compared to that train. Let’s take a look at what it would look like (this pictures is called a “frequency spectrum,” by the way).
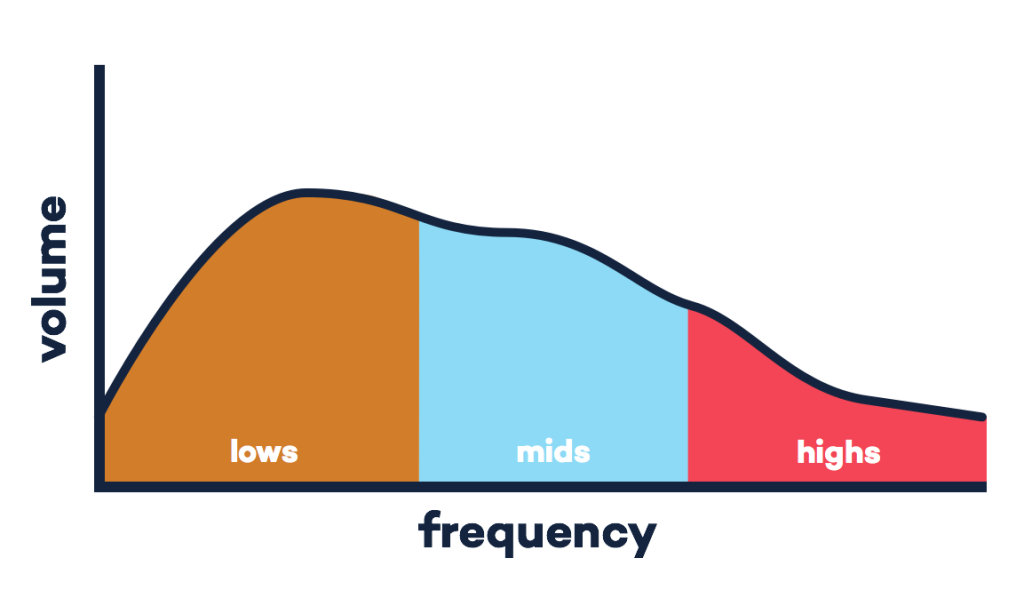
So, sounds aren’t just made up of lows or highs: they’re made up of a mix of frequencies. Even that train had some highs (though not much). Playing with that mix of lows, highs, and mids is one huge way we can tweak our sound as musicians. And that brings us to the EQ.
The magic tool
An equalizer (EQ) is a tool that lets you change the tone of your sound by letting you tweak the frequency spectrum, like in those pictures above. (Reminder: the frequency spectrum is a fancy term for how much highs, lows, and mids a sound has.) Want to turn down the mids in that guitar recording? We’ll do that soon, but first let’s go back in time for two paragraphs.
Here’s a quick story. A long time ago, there was a person who received a phone call from far away. We’ll never know what it was about, but we do know that the sound was terrible. Because the sound needed to travel through so much wire to get from the speaker to the listener, it had started to weaken at some frequencies. Maybe it lost some of its high frequencies, some of its lows, or some combination, but either way it sounded bad.
The phone companies obviously wanted to fix this problem. So, they asked their engineers to come up with a magic tool that would turn up those weak frequencies. Because their goal was to make the sound “equal” at both ends of the phone line, the tool was called an equalizer. Phone users rejoiced, and it wasn’t long until the EQ made its way into music.
Interestingly, the equalizer (or EQ) is often used for the exact opposite purpose in music. Instead of trying to make a recording sound equal to the original, we generally want to change it up and make it even better. The EQ can be used to make a vocal track sound less nasal, a guitar track more warm, or a band sound more cohesive (though it has its limits!). The best part is that EQs are everywhere. Guitar amps have them, audio recording software has them… even iTunes has one (as of iTunes 12, just click Window->Equalizer).
What’s next
In Part 2, we use an EQ on that guitar track to demonstrate some practical EQing tips. Questions, comments, feedback? Get in touch using the contact form or feel free to comment below. Also, you can read about EQing live shows, watch our hearEQ video (just scroll down), or sign up for the newsletter too!
Photo courtesy of Gavin Whitner, MusicOomph.com

Great Article! I love the history: “Equal” at both ends… Thanks Ma Bell!